Tuesday, June 19, 2007

eLearning Games and Simulations (wrap-up)


I had the great privilege of attending the eLearning Games and Simulations workshop on May 24th, 2007 in Bloomington, Minnesota.


The session handouts are posted at: http://www.mngts.org/elearning07games/ - and I am placing the link here as a reminder to myself as well as a method to pay tribute to the many great presenters I met during the workshop.

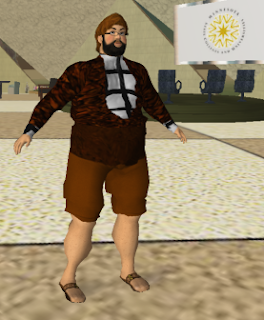
To the right is my current avatar in SecondLife.

New Logo in 5 Minutes


Eariler I had introduced the Paint.Net image editing software (available at http://www.getpaint.net/ ).

With that tool, I was able to create a logo for one of my class podcast sites in only 5 minutes.


You can easily create text-based graphics for you site as well using a small amount of color, some interesting fonts, and some rotated backgrounds. Here are the steps!


  • Create a gradient background (I chose red to yellow). This will be LAYER 1 -- the bottom-most layer.
  • Add a new layer (Layer 2).
  • On Layer 2, create a series of large question marks.
  • Select ALL on Layer 2 and choose the EFFECTS > EMBOSS.
  • On Layer 2, choose the ADJUSTMENTS > CURVES and modify the TRANSFER MAP > RGB to add color back into the gray emboss effect.

  • On Layer 2, choose LAYERS > ROTATE/ZOOM to turn/rotate the question marks to slightly overlay the original gradient background (Layer 1).

  • Add a new layer (Layer 3), and use the text tool to create the word "Management." Separating out words into different layers makes it easier to size and place each word.

  • Add a new layer (Layer 4), and use the text tool to create the word "Clues."

  • Move the elements on each layer to the locations that seem pleasing.

  • Save the FULL layout file (Paint.Net format).

  • Click on the topmost layer (Layer 4) in the Layers tool and then use the LAYERS > MERGE LAYER DOWN operation (this blends two layers into one). Continue this operation until there is only one layer left.

  • Use the IMAGE > RESIZE command to get the graphic to the precise size needed on the web (remember that earlier we saved a full-size version - so this version should be as small as possible).

  • Use FILE > SAVE AS > [SAVE AS TYPE: JPEG] to store the file in a web-ready format.


Building the Logo - tools locations

Paint.Net program showing locations of Gradient tool and the Layers tool.

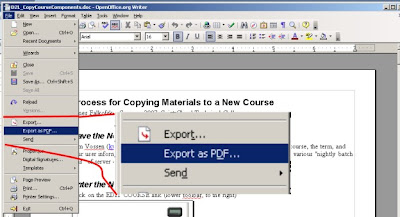
Free PDF Export in OpenOffice


I will often work with faculty who do not have Adobe Acrobat Professional installed on their office or home computers.

However, most of the time, the documents that faculty need to create as PDF files are version of Microsoft Word, Excel, or PowerPoint files.

The open source software suite OpenOffice is a near-clone of Office 2003, but only better. In addition to being able to read and write Microsoft Office formats, OpenOffice also allows the user to
EXPORT as PDF files (for use with the free Adobe Acrobat Reader) as well as the ability to export to well-formed HTML files and images that can be uploaded into online course management systems (such as Blackboard and Desire2Learn).

The download is free!
http://www.OpenOffice.org